Prepare: group, trip plan, water, fuel, communications, first aid.
Recover: stop, assess, dig, add traction boards, winch if required.
Escalate: kinetic recovery only with trained operators and matched equipment; call for professional or medical help when the scene exceeds the group.
Before You Leave Pavement
- Do not take a remote route alone. Bring another person and, on difficult routes, another capable vehicle.
- Tell your closest contact. Share the route, vehicles, people, planned stops, return time, and who to call if you miss check-in.
- Check access and conditions. Confirm the route is open, legal, within the group's skill, and suitable for the forecast. Set a turnaround time.
- Carry delay reserves. Pack water, food, medication, clothing, and shelter for an unplanned wait. Water needs change with heat, altitude, people, animals, and recovery work.
- Inspect the Grenadier. Check tires, spare, inflation equipment, fluids, battery, lights, recovery points, tools, and exterior carriers.
- Keep emergency gear accessible. First aid, water, fire extinguisher, lights, radio, satellite device, and gloves cannot be buried under cargo.
- Stay with a disabled vehicle unless it creates a greater immediate danger. NPS warns that people have died from exposure after walking away from stranded vehicles.
Use a Layered Communication Plan
Every vehicle in a group should use the same radio service, primary channel, and backup channel. Test the radios before departure and agree on calls for stop, obstacle, mechanical problem, lost visual contact, and emergency.
| Layer | Job | Limit |
|---|---|---|
| FRS / GMRS / CB radio | Vehicle-to-vehicle voice | Terrain reduces range. U.S. GMRS use requires an FCC license. |
| Phone + offline maps | Navigation, contacts, route files | Cell coverage can end before the trail. |
| Starlink Mini | Broadband messaging, weather, calls | Requires power, service, and a usable sky view. It is not a distress beacon. |
| Satellite messenger / GPS tracker | Check-ins, tracking, two-way messaging, supported SOS | Features, subscription, battery, and response workflow vary. |
| 406 MHz PLB | Dedicated search-and-rescue distress alert | Not group chat. U.S.-coded beacons must be registered with NOAA. |
Pack Fuel and Medical Gear for a Delay
Reserve fuel is emergency gear when a closure, detour, low-range travel, or recovery could extend the route. Base the reserve on the last confirmed fuel stop and the planned exit. Use an approved container, carry it outside the passenger compartment, and follow local transport rules.
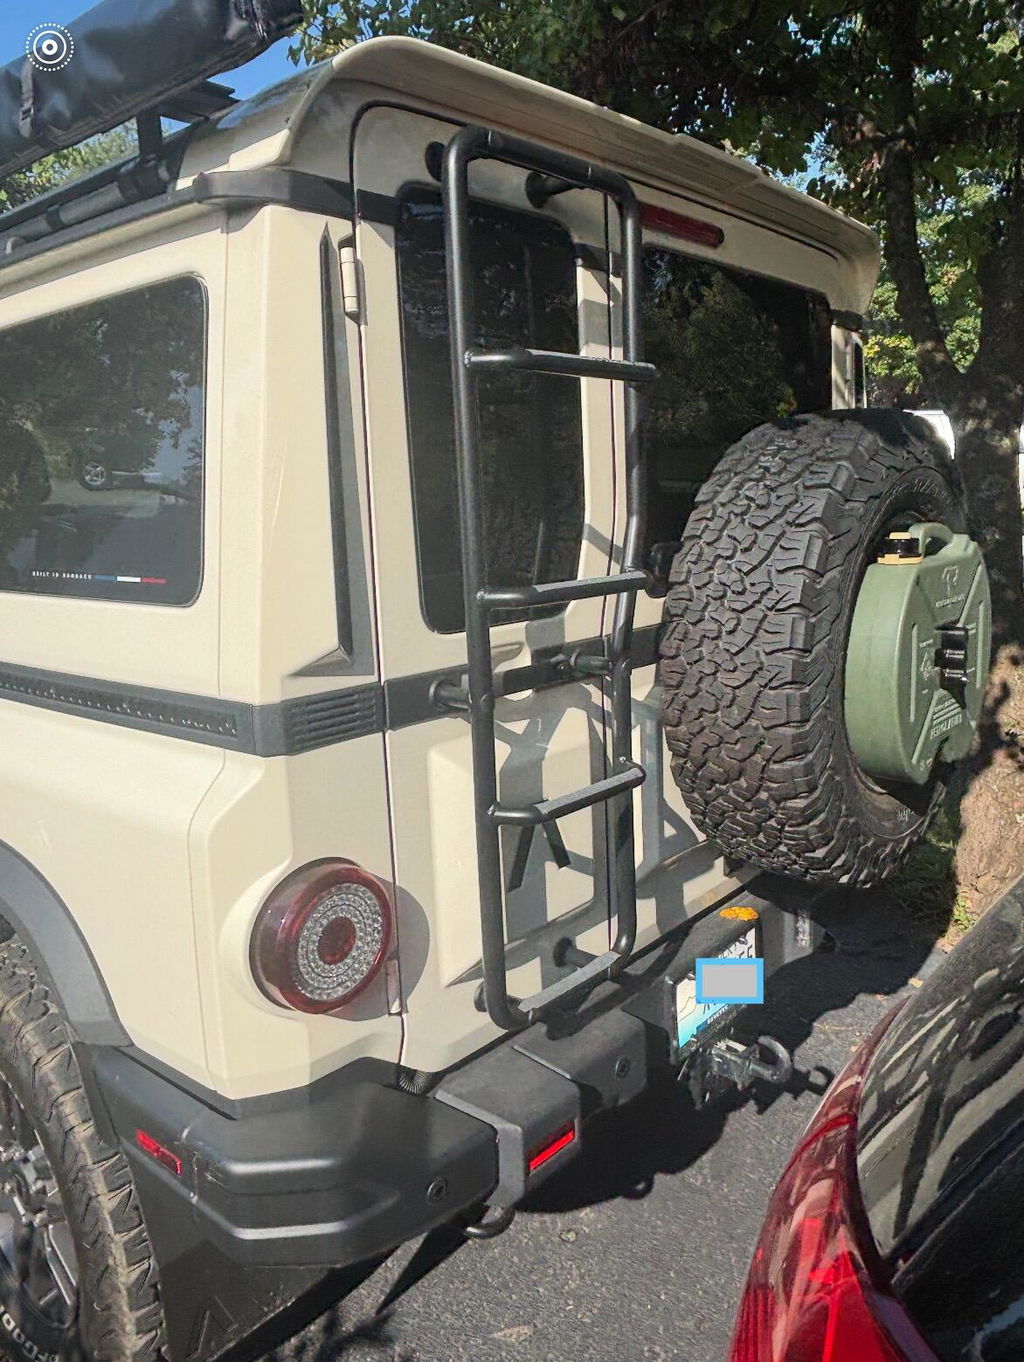
The DVA 20L NATO Jerry Can Carrier fits NATO-pattern cans and attaches to DVA Side or Rear-Ladder Accessory Carriers. The can and supporting carrier are separate purchases.
I love that config so I can carry two for fuel or one for fuel and one for water. I typically do the one fuel and one water for camping excursions.
Brock63, The Grenadier Forum, “Jerry Can Mounting,” April 2025

Build the first-aid kit around bleeding and wounds, fractures and sprains, exposure, and personal medical needs. Red Cross guidance includes nonlatex gloves, compress dressings, gauze, tape, bandages, antiseptic wipes, triangular bandages, roller bandages, an instant cold compress, an emergency blanket, personal medication, and written instructions. Add a commercial splint only if the group knows how to use it.
A kit does not make an untrained person ready to treat major bleeding, a serious fracture, spinal injury, or head injury. Take a recognized first-aid course and carry an evacuation plan.
For Station Wagon builds, the DVA Side Accessory Carrier Gen 2 creates an exterior mounting base for recovery equipment. It fits 2021–2026 Station Wagons, is not listed for the Quartermaster, and carries 25 lb per rail.

Recovery Step 1: Stop and Assess
I would consider a basic kit. Without winch: a long handled shovel ... Maxtrax x2 ... a kinetic recovery rope ... min 2 soft shackles ... gloves.
GlobalGregors, The Grenadier Forum, “Winch recovery kit,” post #122
- Stop wheelspin. Set the brake and stabilize the vehicle.
- Check tires, chassis contact, slope, water, obstacles, leaks, and the intended exit.
- Use only recovery points identified for the planned method and equipment with readable ratings.
- Name one recovery lead, agree on a stop signal, and clear passengers and bystanders.
- Choose the lowest-force method: dig, rebuild the track, add boards, then consider a winch.
Recovery Step 2: Dig and Add Traction Boards
- Choose the shortest safe path to firm ground and straighten the steering where possible.
- Clear material from the tires and remove any mound against the axle, differential, or chassis.
- Shape a ramp and push each board firmly under the tire in the direction of travel.
- Clear the area. Select the appropriate low-range setting and use gentle throttle.
- Do not spin the tires. MAXTRAX warns that wheelspin can damage board teeth.
- Drive to stable ground, park, then retrieve, clean, and inspect the boards.
The DVA Ladder-Mounted Recovery Board Carrier keeps compatible boards outside the cargo stack with tool-free access.

Recovery Step 3: Winch
Read the installed winch manual first. Clutch operation, minimum drum wraps, duty cycle, remote use, and rope requirements vary by model.
- Plan: choose a straight pull and an anchor that can withstand the load. Decide whether the approved setup calls for a single or double line.
- Inspect: wear heavy leather gloves and check the rope, hook, slings, connectors, pulley, anchor, and recovery points.
- Connect: use the hook strap while pulling line. Never wrap the rope around an anchor or hook it back onto itself.
- Tension: engage the clutch fully and take up slack slowly. Stop if a component shifts, twists, binds, or meets a sharp edge.
- Clear: place the damper as the winch manufacturer directs. Nobody steps over or touches a loaded rope.
- Pull: apply power smoothly. Watch the anchor, vehicle direction, rope stacking, voltage, and winch temperature.
- Stop: halt for lost communication, anchor movement, deformation, rope piling, or anyone entering the safety zone.
- Finish: secure the vehicle, unload the rope, inspect every component, and re-spool according to the winch manual.
WARN says not to use a recovery strap for winching because a stretch strap stores energy. Keep winch rigging and kinetic-recovery gear separate and clearly labeled.
Recovery Step 4: Kinetic Pull or Professional Help
Kinetic recovery is a higher-energy method. Use it only with trained operators, verified recovery points, matched vehicles and components, clear communication, and the rope manufacturer's instructions. Do not publish or follow generic speed, slack, or rating formulas: the correct setup depends on the exact rope, vehicles, terrain, and attachment points.
If the vehicle is damaged, unstable, near a rollover, in moving water, or beyond the group's equipment and training, stop. Stabilize the scene and call professional recovery or emergency services.
A 48-inch Hi-Lift jack can be part of a trained recovery plan. Use only the jack manufacturer's procedure and approved vehicle lift points. The DVA Ladder-Mounted Hi-Lift Jack Carrier stores the jack on the factory rear ladder; it is not a lift point.

Sources
- WARN Industries — Basic Guide to Winching
- MAXTRAX USA — Instructions
- American Red Cross — Make a First Aid Kit
- NPS — 4WD and Off-Pavement Travel Safety
- U.S. Forest Service — Off-Highway Vehicle Touring
- BLM — OHV Planning and Safety
- FCC — Personal Radio Services
- NOAA SARSAT — 406 MHz Distress Beacons
- Starlink — Mini Specifications
- The Grenadier Forum — Winch Recovery Kit, GlobalGregors
- The Grenadier Forum — Jerry Can Mounting, Brock63
The DVA Setup for This
Keep Recovery Gear Reachable
Use the rear ladder or Station Wagon side carrier for boards, a jack, and reserve fuel. Verify each accessory and the complete mounted load before departure.
Shop Recovery Mounts → Grenadier Collection